Let’s get growing! You do not need a yard or a balcony for this garden project. These little bites pack a punch — more flavour and more nutrition than the average salad green. Adding home-grown microgreens will definitely make salad a new favourite. Food tastes so good when you grow it yourself.
Let’s get started with two varieties that are sweet tasting and nearly failsafe growing. Easy peasy!
SHOUT OUT to Food Pedalers, our local East Van sprout farmers, who donated this huge jar to us!!!

INGREDIENT LIST
- Speckled Peas: to grow, you will need your sunniest windowsill to give the pea shoots at least 3 hours of light per day. We are using pea seeds a friend gave us. Sprouting variety available from West Coast Seeds or other garden stores.
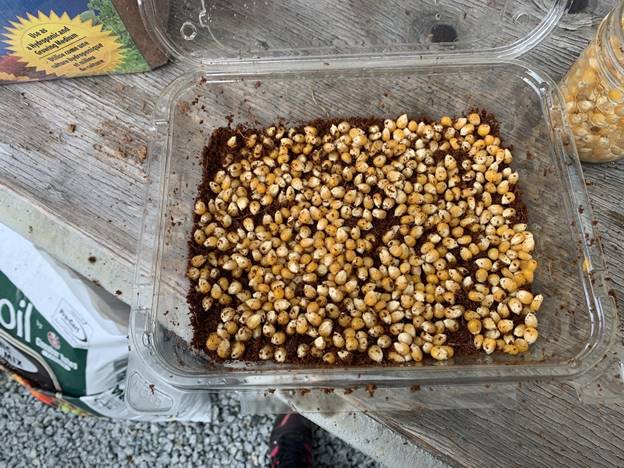
- Organic Popcorn: to grow, you will need a dark cabinet or Rubbermaid in a closet. We are using popcorn from the bulk bin from the grocery store.
Extend the learning – more varieties, more flavours!
- Black Oil Sunflower Seeds: nutty flavour, grows faster if you pre-soak overnight.
- Daikon Radish: Spicy.
- China Rose or Red Radish: spicy dark purple leaves
- Arugula: Spicy.
- Beets: Bright red and earthy. Cover with soil rather than putting on top.
Tasty tip:
- If going for multiple kinds of sprouts, don’t forget to label what is what! And I like to write the date so I know when they should be ready.
- We are experimenting with Quinoa and French Green lentils from the pantry. We will let you know how it goes and how they taste in a couple of weeks. Stay tuned!
EQUIPMENT LIST
- Clean container, must hold 2 inches of soil and have have drainage
- Clamshell boxes – find them in your recycling bin, plastic containers that held tomatoes, strawberries, yogurt – get creative! If the bottom is solid cut slits using an exacto knife.
- A paper cup – punch a hole punched in the bottom and kids can draw faces on them and the sprouts become hair!
- A sterile growing medium (no compost or fertilizer needed)
- New from the bag OR
- Coconut coir, a more sustainable option
- Bucket or bin
- Watering can &/or spray bottle
- Hand trowel (or just use your hands!)
- A tray or Rubbermaid lid
METHOD
1. Prep soil in a small bin or bucket. Here are two options you can use for soil:
- Coconut coir, take a chunk off the block and soak in a bin of warm water – it will expand to 3x the size. You want it to be moist through and crumbling it makes it a bit faster. We like coconut coir because it’s sustainable compared to potting soil made with peat from bogs.
- Potting soil, it’s still a good idea to moisten soil in a bin or bucket before filling containers. This makes it just easier to get the moisture level right before seeding.
2. Put soil into your clean container. At least 2 inches of soil, evenly spread and pressed into place but not packed down.
3. Cover the soil with a single layer of seeds and push them down onto the soil so they have good contact but are not covered with soil. They will grow quite dense if they cover the surface and that means you get more sprouts at harvest time. Place on tray or Rubbermaid lid for water run-off.
4. Place in growing location. Depending on what you are growing you will need to give your sprouts a certain amount of light.
- Place POPCORN in a dark place to grow. Yes, it’s surprising but they will be bright yellow and tender if grown with NO LIGHT! I put it in a Rubbermaid in the closet.
- Place PEA SPROUTS in a sunny-ish spot. They do pretty well even in low light, so give it a go even if you live in a Vancouver garden level suite.
5. Wait and water. And we watch over them with love. Watering is the key to success. Not too much, not too little – damp like a sponge you have wrung out. If you water daily with a watering can, you may get mold growing on the soil surface so we suggest using a spray bottle twice per day but take care not to let the under-layer of soil dry out.
6. Harvest in 10 days to 2 weeks.
ACTIVITY INSTRUCTIONS
 STEP 1
Gather ingredients.
 STEP 2
Gather equipment.
 STEP 3
Moisten soil (we are using the coconut coir here).

STEP 4
Crumble soil with your fingers. It’s ready when moist throughout, but not soggy.

STEP 5
Put soil in clamshell and tap down to flatten. Aim for a level soil bed that is firm with no air holes but not packed down too tight for the roots.
 STEP 6
Put a single layer of seeds and press them down into contact with soil.
 STEP 7
Put them in a good place to grow with as much or as little light as they need.
 STEP 8
Water for longer than you think with the spray bottle. That’s not hard for kids usually!
 STEP 9
Watch them grow!
Curriculum Connections

Science

Language Arts
© Project CHEF
Not to be copied or reproduced without express permission from the author


